Sunday, May 27, 2012

And another Pinterest post!

Our house is old.  I love it, but it's old.  When we first looked at this house - it was a wee bit hard to see the bones of the house through all the crap.  And wow, was there a lot of crap.  There was an older woman living here - the only owner of the house, I believe.  She loved pink and pink and pink and then she loved wind chimes.  There were wind chimes everywhere - in the house, outside the house - everywhere.  I remember walking up the stairs to the bedrooms and my dad bumped his head on another set of wind chimes.  Seriously!!

There was wallpaper and/or border everywhere.  The foyer, the bathrooms and all three bedrooms had some form of paper stuck on the wall.  I'm not even sure now which room was the worst.  I guess the guest bath was probably the worst.  It's that lovely shade of mint green tile.  The wallpaper was pink and blue flowers - nothing in it matched the green tile at all.  Crazy stuff.  I really liked the green tile once the wallpaper was gone.  It's really old, but not a terrible shade, I've seen worse.

Anyway, we painted a nice light brown (Chatham Tan to be exact) and I decorated slowly with creams, whites, and various shades of brown.  I really liked it.  Eventually I decided I wanted a darker shade of brown.  Now it's the color of YooHoo!  It's much better now.  I added some vinyl to one wall last summer, one piece a week it seemed, after getting my Silhouette.  I took about three months to make a cute wreath, too.  Do you see a pattern here?  I am a slow crafter!

The bathroom also had those terrible sliding glass shower doors.  Horrible.  Hate them with a passion.

I finally got Jason to take them down during Spring Break and I started working on a shower curtain.  I really wanted this:


$69 is a wee bit over my budget though - okay more than a wee bit.  I really liked this one, too:


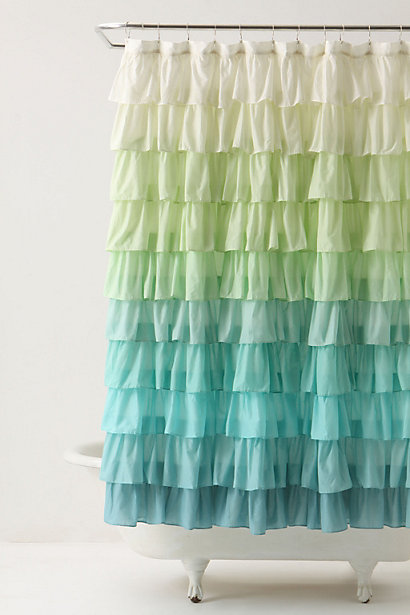
But in white and not for $118. 

So, I went through Pinterest and looked for tutorials.  I found several and sadly, followed none completely.  I ended up buying a white shower curtain and a white king size sheet - which was fitted and should have been flat.  Anyway, I measured and cut fabric (not perfectly, but good enough).  I left the edges raw - which I loved.  I ended up with five ruffles along the bottom instead of the three from the top picture.  I love it.  I hung it up and realized my ruffles were REALLY crooked.  So, not I can't even show you a picture because it's just that bad.  

So, the first thing on my Summer to-do list is to make some fabric flowers out of a twin sheet, which again was fitted and not flat - will I ever learn to read the labels better?  And I'll stitch on the flowers randomly along the top of the first ruffle to hopefully even it out a bit so you won't be able to tell it's so crooked.  I'll post the finished project - one day.  Remember, I'm a slow crafter.  

Here's the inspiration for the flowers:

 
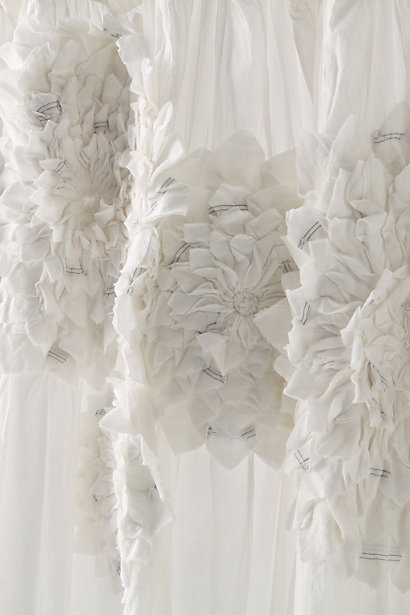
also from Anthropologie

Anyone else make great fabric flowers that I can use as inspiration?  I can't wait to finish this project, it really bugs me every time I go in there and see the curtain closed and all crooked! 

Thanks for stopping by!
Lisa

Saturday, May 26, 2012

And a little more Summer crafting - if I'm lucky

I was reading blogs this past weekend and came across this lovely find:


This blog is fabulous - I got a little lost in this one post - figuring out how I can make it.  But the rest of her posts are great, too!  Now, back to my plan - I have a fixture similar to this one below and think maybe there's a way to make it into what's above! 


Here's hoping I can come up with a plan and Jason will help out! It seems like such a waste to have that space inside and not use it.  So, I'm thinking we could take one side off and put shelves inside to hold it all together.  I don't mind the slat board on one side, but maybe I could cover another side with cork and have a cork board area.  Not sure about the last side - I may just leave two opposite sides as slats and the back side as cork.  I'd like to paint the whole thing, too.  Hmm, sounds like a big project but I'll have time!!  Hopefully I'll be back in June with a finish project!

Thanks for stopping by!
lisa


Friday, May 25, 2012

Pinterest fun

Pinterest is so much fun - so inspiring.  I just wish I had time to actually do what I pin.  So, I thought to motivate myself to get a fun things in the works - I would post some pins here that I'm hoping to tackle this summer.  Let's see how many actually happen!


That camera and owl are too cute - I would love to find some fun pieces to spray paint in fun colors for Cole's room or my guest room.


I would love to make these Chocolate Chip Cheesecake goodies, too!  Maybe for the Fourth of July? 


I would love to try to make something like this.  I love the Alabama one here, but I'd like to try a house shape with our names inside.  I think that would be nice in my foyer - which did get a makeover but not with any of the things I blogged about doing there.  I'll share that soon, too!

So, just a few things I want to work on.  There are tons more, of course, thanks to Pinterest!! 

Thanks for stopping by!
Lisa

Thursday, May 24, 2012

So where have I been?

Well, I have been a terrible blogger this year.  Terrible! And now I'm feeling like I should start blogging more and have no time to do it.  I have a few things floating around in my head that I want to blog about and just can't sit still long enough (when not working on other things) to get it done.

I'm sure I mentioned earlier this year that I had been hired to tutor 3rd, 4th and 5th grade at Cole's school.  Well, the job was winding down - I was only supposed to be there through testing.  As testing approached, I was worrying about the rest of the year, about next year - you know, the same thing I do each spring since graduating.  And then I realized my certificate was about to expire, too.  Fun times.

Two things happened around the same time.  First, a position became available at school.  It was a paraprofessional position in a self contained special needs room.  The principal mentioned it and asked if I was interested and I said absolutely!  He said he would know if a few days and let me know if the job was mine.  So, several days later he said it was a done deal - the job was mine.  I was so excited.  At this point, I didn't even know which classroom I would be in but it didn't really matter.  Turns out it's a classroom with a teacher I already knew a little and just loved.  So score for me.  Then I started getting into the renewal process for my certificate.  WOW!  Why didn't I look at this earlier?  If you haven't taught for three years, you have to take a class (I'm a UAB student now) and have 50 hours of professional development.  I don't have that!!  I don't even have an hour.  So, now I'm taking a mini session at UAB, four nights a week for three weeks.  Week one is done and gone and I survived, but just barely.  I'm taking two professional development online courses at the same time.  None of these are super hard, but all are time consuming and most assume that I've had a classroom and have some real life experience and I just don't.  So, I'm really digging in and handling it the best I can.  I have two weeks at UAB left and a little more than that for the professional development.  I need to get finger printed and all that again, too!  Fun times.

Just when I was thinking I had more than my foot in the door, the bad news came.  Our school is losing it's Title One status and we are losing four more units.  We lost three last year.  We are getting smaller and smaller but seem to have more and more kids.  So, so much for my foot in the door.  Still no classroom for me.  But, the great news is I can stay where I am until I find a classroom of my own.  I love the room I'm in now.  The teacher is great, the other para is great, too and I love the kids.  It's been a great ending of the school year (well, we have a little more time left, but most of our kids are done now!).  So, the great news is I'll be at Cole's school for another year, with him - which is so important to me.  I'm glad I'll just be down the hall and around the corner from him for his last year there.

So, that's me and what's been going on.  Super busy right now.  Trying to finish up the school year, finish these classes and get ready to jump into summer!  I can't wait for summer break.  I have a million projects I want to tackle - first being cleaning out the guest room and getting my craft supplies back in order.  It's ridiculous, really.  A giant mess.  But it happens every year.  I spend a few days during Christmas break putting things back where they go, finding the floor again - organizing.  Then again in the summer, same thing!  If I could just put everything back to begin with - but that's another post.

Thanks for reading and hopefully there's more to come!

Lisa

Wednesday, May 23, 2012

Christmas in June, really?

I just found another tutorial I haven't shared yet. I know it's way past Christmas, or maybe you could look at it as way early - either one - here it is:

I wanted to share with you a little 'Days 'til Christmas' countdown.  My son has always loved to countdown to something - whether it's a holiday, a day off school, a vacation, a trip to see his grandparents - you name it, he wants to know how many days are left!  So, we have tried lots of different versions of a countdown.  As he gets older, it's harder to come up with fun, different ways to count down.  We've done 25 small family gifts and 25 Christmas stories, but those seem to be more for all of us and I really just wanted to make something he could be in control of.  This is what I came up with.


Supplies:  metal serving tray or cookie sheet, chalkboard paint, Silhouette (or other cutting machine, or letter stickers), vinyl for cutting machine, clothes pin, chalk, hot glue gun, crop-a-dile, masking tape and ribbon.

The first step is to tape off any section you don't want covered in paint.


I just did a simple border around the tray, layering and folding my tape to get a good, smooth edge.  Spray paint according to manufacturers instructions.  Set tray aside to dry and after 24 hours, cover with chalk and then erase.  Now you're ready to decorate your tray.


I picked a simple font for the title "Days 'til Christmas" and cut it out.  I also picked a simple frame shape to cut out.  This is the spot for our 'days'.   I also added a cute present at the bottom.  You could skip the 'Christmas' and do a simple vinyl line and use this for anything you are counting down to.


You can use transfer paper to move your letters from your cutting mat to your tray, or use clear or white contact paper (you can see through the white contact paper pretty well).  I didn't have either on hand, so I just eye-balled it.  I did have a little trouble getting my frame to lay down smoothly, so the transfer paper would have helped a lot with this frame.  There are other frames that have straight edges - those are a bit easier to do without the transfer paper.


Now, pick your spot for your clothes pin (this holds your chalk) and glue it in place.

This is where you could decorate a bit more.  Covering the clothes pin in patterned paper, or adding some ribbon would be really cute. A fabric rosette would be nice, as well. We already decorate every square inch of our house, so I decided to leave this a little on the plain side. And honestly, the less fussy the clothes pin, the easier it will be for my son to take the chalk out himself and change the number!! I really wanted him to be able to use this each day, instead of it being something only I could keep up with.

I left the tray alone for a while to ensure my hot glue was good and dry.  I then took my Crop-a-dile and punched two holes in the top of my tray.  I just guessed at proper placement of the holes - I'm an eye-ball it kind of girl!!  I strung my ribbon through the holes and tied a knot - now it's ready to hang up!!


Again, Here's the final look - sweet and simple.


This is a really inexpensive way to make a countdown.  Great for kids - you can make one for each child and they can each change their day (less fussing over whose turn it is).  I think this would also be a cute teacher gift - if your child's teacher celebrates Christmas in the classroom - they could use it to countdown to Christmas break or end of the school year!!

I've seen this done with "days 'til" and a blank line so you can fill in the number and the occasion - that would be really cute, too!

Thanks for stopping by!
Lisa

Sunday, May 20, 2012

tutorial i forgot to share

Well, it's been a while - a long long long while!  I did this little tutorial for The CSI Project a little while back and forgot to share it here - so here it is:  

I know we've all seen clipboards decorated with paper, ribbon, paint, etc.  I think I've made more than I could use in a lifetime!! BUT, I was walking through a store a few weeks ago and saw a super cute clipboard.  It had a great shape to it - not just your basic clipboard shape.  The problem - it was $13.99 and that's just nuts!!  So, I picked up a clipboard from the dollar store and got some tools out.

Supplies needed:

Clipboard
Template with desired shape
Dremel (or similar tool)
Paint (optional)
Patterned paper
Mod Podge
Sand paper or nail file
Adhesive runner (optional)


First, I found a shape I wanted for the bottom of the clipboard.  I used my Silhouette to cut the shape I wanted, but you could sketch it out, or print it and cut it out.  I traced the shape on my clipboard and got busy.


I used a Craftsman tool that's similar to the Dremel.  I started slow and sanded away right below the line I drew.


Since the bottom of my design ended close to the bottom of the clipboard, I just started at the edge and drilled in for that small section.


Then I moved to the side areas and  I sanded, sanded and then sanded some more.  I just continued to sand and sand until I could see a little light through the clipboard.


I was able to just break off the bottom section eventually.

As with any project, be sure to wear proper safety gear and remember to not let your tools overheat.  I stopped three or four times to give the Craftsman a break and cool off a bit since this took a lot of sanding.


Once the bottom section was removed, I sanded along the edge and smoothed it out.  I went ahead and sanded all the way around the clipboard, front and back, just to have a consistent look!!


Here's a close up:


Now it's time to  move on and decorate the board.  I decided not to paint my clipboard since the paper I picked went well with the natural color of the clipboard.  If you want to paint, this is the time to do that.  Then you can pick your paper.


I coated the back of the paper and the clipboard with Mod Podge and then placed my paper on the clipboard.  I use extra Mod Podge on the curved end since there isn't a straight edge.


Then I coated the top of the paper with Mod Podge.  I would give the clipboard time to dry before applying the top coat of Mod Podge.  This is when you wait and wait and wait for the Mod Podge to dry!


I added a few scraps of paper to the top of the clipboard, as well, applying it the same way.


Once my clipboard was mostly dry, I took a nail file and filed off the edges all the way around the clipboard.


I decided to add a piece of ribbon around the clipboard and I attached this with my adhesive runner.  I'm thinking I could loosen the ribbon and slip a pen in and tie it back!!


And here's my finished clipboard - I simply added a cute note pad and it's done.


I had everything on hand except the clipboard and it was only $1!!  I really want to make a few more and try different designs. We have friends we play cards with and one would be really cute to use for us to keep score on.  I think I'll make another one with a scalloped border.  And Teacher Appreciation is just around the corner and you know teachers can always use a clipboard and there's even room to put a name across the bottom! 

Thanks for stopping by today and I hope you enjoyed this little tutorial - now go run to a dollar store and get crafty!!

 Thanks for stopping by!
Lisa

LinkWithin

Blog Widget by LinkWithin